R1067 Winter workshop

Any Technical Queries? This is the place to ask/give advice.
User avatar
millermilla
Posts: 182
Joined: Mon May 07, 2007 10:16 pm
Location: Burgess Hill West Sussex

R1067 Winter workshop

Post by millermilla » Mon Jan 04, 2010 12:36 am

Well I've been a bit slow getting started mainly due to the arrival of Charlie but today I finally made a start.

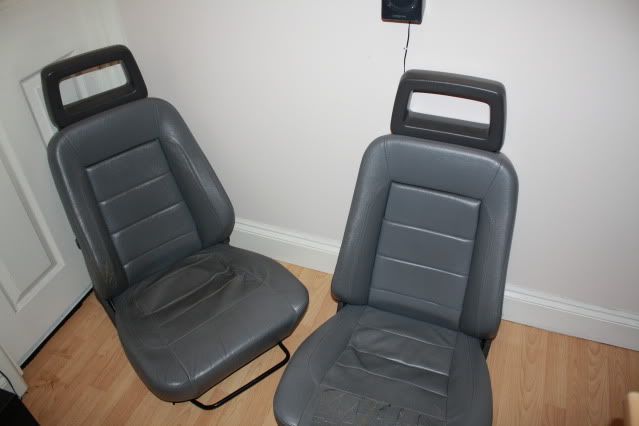
First job on the list was to remove the front seats which I'm taking over to The Trimming Centre in Hove tomorrow to be fully overhauled. Already managed to scratch a wheel arch trying to get the seats out with the car in the garage :(

Image


Next job was the bonnet. I have removed the bonnet in preparation for respraying it but first I have removed the bonnet scoop which I'm taking down to Autopaints in Brighton to have the colour matched in 2 Pack base.

Image

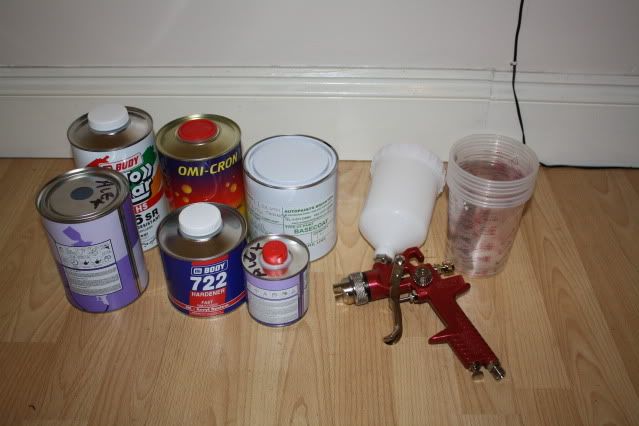
Had a spend up at Autopaints. Don't have a clue what to do with it all but I'm sure I'll learn LOL

HVLP Spray Gun
2K Base
Universal thinners
2K Clear coat
Activator
Filler primer + activator
Mixing cups


Image

I've got a Clarke Hunter 55 which is probably a bit small for serious spraying but should be OK for doing the odd panel. I've given it a bit of a try and you just need to be a bit patient with it and not rush.

Image

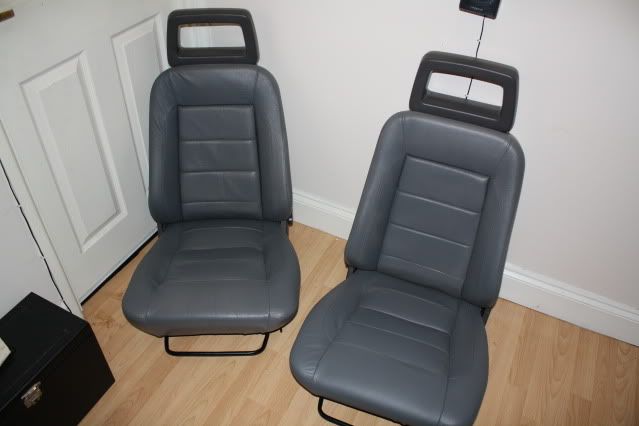
I got my seats back today. I have to say im very pleased with them, they look like new. They both had a couple of panels replaced then they were re-bolstered and filled. It cost £405 to get done which sounds expensive and it is but it's not like you can go out and buy a pair of original ERA seats so you just have to pay the money! The picture doesn't really do them justice, they look great. You really see the difference when you compare before and after.

Image Image


Filled bonnet

Image

And sprayed in 2K primer filler ready for wet flatting

Image

Base coat

Image

I let the 2K primer dry for 24hrs before wet flatting with 800 grit wet and dry. The 2K primer seemed a lot harder to rub down than the stuff you get out of a rattle can. I carefully spirit wiped the bonnet and tried to make sure there was no dust in the air but I still managed to get all sorts of crap in the base coat. I can see why the pro's use a booth now.

Image

Clear coat. I made the fatal error of thinking "Ill just give it one more coat" moments later it's got more runs than the West Indies cricket team :( Ohh well all I can do is wait for it to fully harden and see if I can flat them out. On the plus side the clear coat does a good job of hiding all the dust that was in the base coat and the shine is amazing.

Image

An action shot Angie took LOL

Image


I spent about 4 hours wet flatting and compounding the bonnet yesterday to get all of the runs out and it's turned out pretty well. Started out with 800 wet and dry then worked up to 1500 before using rubbing compound and T cut. All by hand and oh my god was it hard work LOL

Image

Image

Refitted the seats too

Image

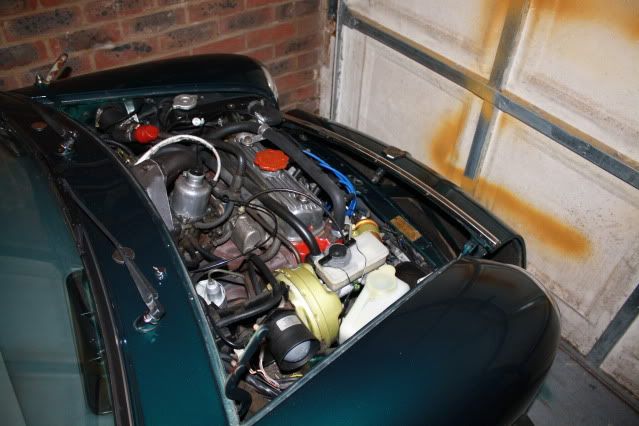
What next then? I need to start on the front parts of the body kit but I think my hands have done about as much rubbing down as they can do this year. Might play with some oily bits instead.

Phase 2 begins. The plan is to remove the front bodykit sections which also include the side skirts and repair the damage caused by years of close calls with high kerbs. I also want to see what the condition of the bodywork and sills are like behind the fibreglass kit.

With the bodykit removed I was pleased to find original sills still in very good condition. There are a couple of smalls areas of rust around where the fixing screws have been drilled into the sills. Two of the fixing screws rounded off so I had to resort to the trusty old angle grinder.

Image


O/S/F corner, again in pretty good condition for a 20 year old mini. While I've got the kit off im going to replace the front teardrop subframe bushes and fit poly ones as they are almost imposible to replace once the kit is back on.

Image

O/S/F wheelarch. You can clearly see the original side repeater hole and the extra lip welded on the arch to mount the bodykit

Image

Jacking point, unique to an ERA as the bodykit gets in the way of the original jacking point

Image

Here's the bodykit section waiting to be repaired. It looks OK in the pics but when you look closer the paint is cracked and the front is covered in stone chips. This is the better side of the two sections.

Image


Just got to pull my finger out and get stuck in now. There is quite alot of prep work to be done
Keith Miller

An old original

Re: R1067 Winter workshop

Post by An old original » Mon Jan 04, 2010 4:36 pm

I can't believe the lack of rust!!

How many miles have you/it done??

D

User avatar
G96LUE
Posts: 466
Joined: Wed May 23, 2007 7:21 pm
Location: Walsall

Re: R1067 Winter workshop

Post by G96LUE » Mon Jan 04, 2010 10:04 pm

I agree, the bodywork behind the arch kit is amazing for its age.
The bonnet repair looks excellent too.

Just out of interest, how was your bonnet bulge attached.
Richard Szpala said his appeared to be bonded in some way. mine is bolted with captive threaded nuts fixed into the bulge.

My engine came out on Friday and is now in a pile of bits all over the garage floor. What fun :)

See you soon
Darren

paul
Posts: 276
Joined: Tue Jan 16, 2007 10:20 pm

Re: R1067 Winter workshop

Post by paul » Tue Jan 05, 2010 12:31 am

Looks good some pictures of how they cut the front panel and wing and a panel and how the reinforcements are done would be a great reference for the future while its in bits. Also useful for a little project I'm working on.

Didn't rust in Japan much did it ;)

I have to do some work on the Black one soon you blink and its April from now on..

Paul

User avatar
millermilla
Posts: 182
Joined: Mon May 07, 2007 10:16 pm
Location: Burgess Hill West Sussex

Re: R1067 Winter workshop

Post by millermilla » Tue Jan 05, 2010 12:51 am

The bonnet scoop was stuck on with double sided tape and was a real nightmare to get off without damaging the scoop itself. Couldn't see anywhere for captive nuts?

The lack of rust constantly amazes me with this car. I was half expecting to find some nasty bits behind the bodykit but there is barely any rust at all. Although the car is a UK spec car it spent most of its life in Japan hence the lack of rusty metal. The mileage is now 27,000 which I cant really be 100% sure on as I have no history of the car while it lived in Japan however I have little reason to think it has done much more than that shown on the speedo
Keith Miller

paul
Posts: 276
Joined: Tue Jan 16, 2007 10:20 pm

Re: R1067 Winter workshop

Post by paul » Tue Jan 05, 2010 10:25 pm

Keith the mileage is right on it I bought it direct from Auction in Japan and it was graded and mileage verified, in Japan all inspection records and change of owner require a mileage to be entered and so they are easily checked when auctioned and in the event of something being incorrect the auction house will refuse to grade the car. Cars in Japan can rust but in a manner more like motorhomes in UK where they get laid up damage where water or moisture sits and and so a small nasty localised area can result such as in the area between the bonnet skin and the supporting frame. I found a little bit on my black one on nearside floor where it joins the heel board which I need to deal with. Shay had a small area in similar spot on the Red Japanese one I sold him (the irish reg one at IMM2009)

The Japanese cars suffer more from paint fading seat cracking and foam falling to bits and any thing rubber perishing. In fact I think I will buy all rubber bushes and seals and replace the lot on the black one over the next while. Front cones are also an issue I did a pair on a normal Japanese Mini last week that was sat very low and they where seriously compressed never saw anything like it will pic it and post it soon. Perhaps that is an issue with mine sitting so low. Might be worth having a look at yours, I know you put hi/lo on but they just raise the height but dont restore suspension travel.

Glad your still happy with it, though sadly it will be hard to bring more for sensible prices until the currencies change.

Paul

User avatar
millermilla
Posts: 182
Joined: Mon May 07, 2007 10:16 pm
Location: Burgess Hill West Sussex

Re: R1067 Winter workshop

Post by millermilla » Tue Jan 12, 2010 8:35 pm

Thanks Paul. Suspension cones are on my to do list. Although I have my HiLos set very high I have very little suspension travel.


Bit of an update:

With the bodykit off I decided to carry out some preventative repair work on the panels covered by the kit. There were some small areas of surface rust which I rubbed down to bare metal with a wire wheel on a drill and then treated with a couple of coats of kurust. As the panels behind the kit will not be seen once the bodykit is refitted I painted the area with a couple of thick coats of Hamerite which doesn't exactly give the best finish or paint match does give very good protection and as it's not going to be seen I would prefer protection over cosmetic looks. All the hidden panel work will also be treated with waxoil and I have bought some stainless steel screws from the nut and bolt store in Portslade to use when refitting the kit

Image

Image

The next job was to repair the fibreglass kit which turned out to be much harder work than anticipated. I started off by cutting some fibreglass strips and strengthening some of the areas that had been weakened over the years by little knock and bumps, I then filled and rubbed down some of the larger damaged areas before priming with primer filler and flatting back ready for paint.

Image

Even though I spent a good 3-4hrs working on the section of bodykit once I rubbed down the primer filler I wasn't 100% pleased with the finish. the problem is the kit has been repaired several times before and in some places there are at least 6 layers of paint on top of several layers of filler and to be honest I'm no specialist when it comes to fibreglass repairs so with hands and fingers blistered from rubbing down and preparing in this rare case I decided 95% was good enough and to be honest the bits I'm being critical of are 2" off the ground and will never get that close an inspection.

Time for spraying! Well this is my second attempt after doing the bonnet which turned out fine but needed a lot of finishing so this time I plan to get it right first time if I can. I spent ages preparing the make shift spray booth, covering and dusting everything so less dust ends up in the paint. My biggest hurdle is trying to spray when it -1 degrees so I have some heaters on for a good hour before spraying and manage to get the "booth" up to 16 degrees.

Big lesson learnt from first go at spraying was to take it slowly so I started with a very light base coast and gave it 10 minutes to become tacky before adding three more coats with about 10 minutes gap between each coat getting progressively thicker. I must have learnt from my mistakes as the paint went on perfectly so I was well pleased.

When I applied the clear coat to the bonnet I did so two days after the base coat but speaking to a friend they said the clear coat should be applied a few hours after the base coat so it will bond correctly so I gave the base coat three hours then started on the clear. When I sprayed the bonnet I put far too much clear coat on and too quickly so this time I again done a light first coat and gave it 20 mins to go tacky. I find clear coat really hard to spray it seems so easy to get it wrong and put too much on but it's very hard to get the balance between too little and too much but I think I got the first coat just right. To be honest the first coat looked perfect and I was thinking about just leaving it as it was rather than spoiling it but I really want a top finish so after waiting 20 mins the paint was really sticky and ready for the second coat. I applied the second coat quite heavy with the hope that the sticky first coat would prevent sags and runs which it did. There is the odd run here and there but I know it wont be too much trouble to flat out once it's fully hardened but I've got to say I am very very happy with the finish. It's really come out nice :)

Image

Image

Almost ready to refit the bodykit but I'm waiting for some wheel arch rubber in the post so for now I'm going to fit some Duflex Poly teardrop subframe bushes as they area almost impossible to replace once the kit is back on. The old ones are fine I just don't want to have to replace them in the future!

Image

That's all for now folks :D
Keith Miller

User avatar
millermilla
Posts: 182
Joined: Mon May 07, 2007 10:16 pm
Location: Burgess Hill West Sussex

Re: R1067 Winter workshop

Post by millermilla » Sat Jan 23, 2010 2:40 pm

I have now refitted the body kit with new rubber trim and stainless steel screws and washers. I had to do a little wet flatting as there were a couple of small sags in the lacquer but not as many as the bonnet and it only took about 20 mins. I'm very pleased with the finish and would like to get on with the other side but due to the house flooding we have to move out for approx 3 months while workmen come in so sadly I don't think I'm going to be able to get much done for a while :(


Image

Image
Keith Miller

paul
Posts: 276
Joined: Tue Jan 16, 2007 10:20 pm

Re: R1067 Winter workshop

Post by paul » Sun Jan 24, 2010 8:50 am

Looking really good, what happened with house? Flood water after snow? I know you live at bottom of a small slope? or burst pipe?

Thanks for the ERV badge looks brill, came Thursday after being bounced arround Royal Mail we moved out of the Garage last April and so had a divert on till recently which had ran out so was lucky to get it.

Cheers

Paul

User avatar
millermilla
Posts: 182
Joined: Mon May 07, 2007 10:16 pm
Location: Burgess Hill West Sussex

Re: R1067 Winter workshop

Post by millermilla » Sun Jan 24, 2010 11:11 am

The flood was caused by a collapsed surface water drain which services 12 houses before it gets to ours so it all just backed up and came out of the drains instead of going down them. They have yet to dig the hole to find out the cause but I strongly suspect it's the roots of the tree that's out by the side of the road.
Keith Miller

Post Reply